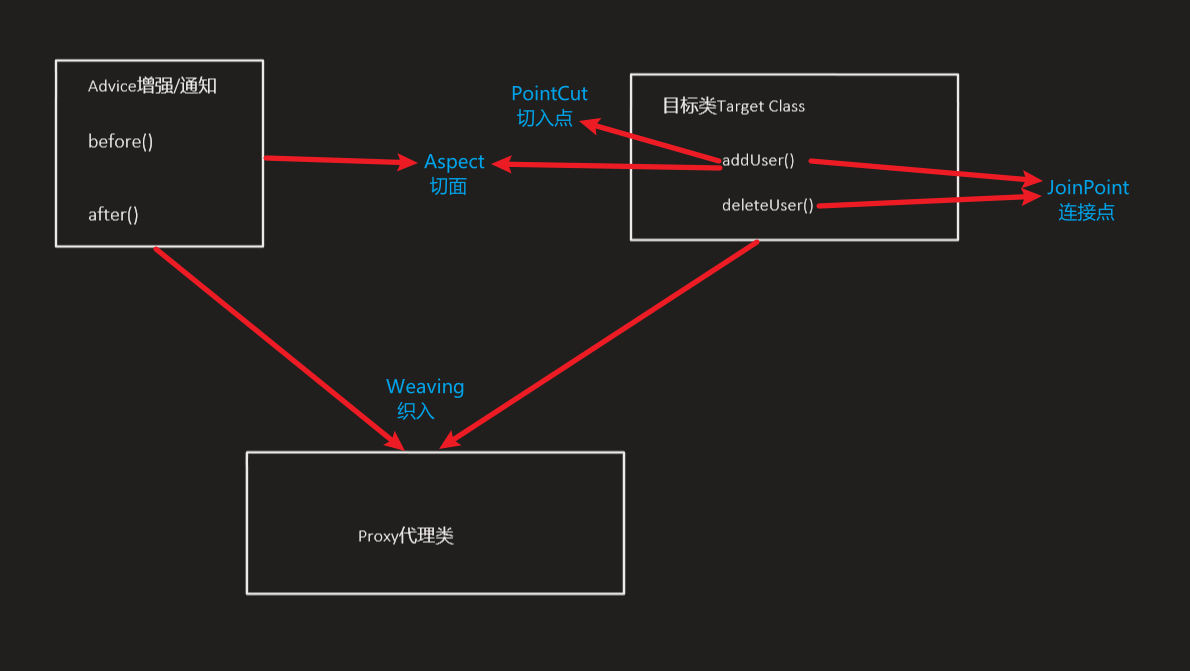
本次文章主要对AOP和AOP的实现原理进行探究。
代理模式
谈起Aop的实现原理离不开代理模式,代理模式的目的是在不改变源代码逻辑的基础之上添加对应的处理逻辑,实现对原始类方法的增强。代理模式又分为动态和静态代理。下面将会介绍JDK两种代理模式的具体实现,在开始具体代码之前,先准备两个通用类:
目标类接口
public interface UserService {
	public void addUser();
}
目标类
public class UserServiceImpl implements UserService{
	@Override
	public void addUser() {
		System.out.println("ioc add user");
	}
}
静态代理
在使用静态代理要注意以下两点
- 目标类实现了相关的接口
- 代理类和目标类实现相同的接口
代理类
public class ProxyService implements UserService{
	private UserService userService;
	public ProxyService(UserService userService){
		this.userService = userService;
	}

	@Override
	public void addUser() {
		System.out.println("proxy service before ........");
		userService.addUser();
		System.out.println("proxy service after ........");
	}
}
测试类
public static void main(String[] args){
    UserService userService = new UserServiceImpl();
    ProxyService proxy = new ProxyService(userService);
    proxy.addUser();
}
通过上面的代码可以看出,代理类的生成时机为编译期,效率相对较高。如果需要代理很多类的时候,需要创建大量的代理类,不利于扩展。
动态代理
动态代理中代理类和目标类不需要实现同样的接口,但目标类必须实现相关接口。
代理类
public class ProxyService{
	private UserService userService;
	public ProxyService(UserService userService){
		this.userService = userService;
	}

	public UserService createService(){
		/**
		 *参数1 类加载器  动态代理创建在运行时 需要类加载器加载到内存中
		 *参数2 代理类类需要实现的接口	使用目标类实现的接口即可
		 *参数3 处理类	主要用于处理代理类相关方法
		 **/
		UserService proxyService = (UserService)Proxy.newProxyInstance(MyAspect.class.getClassLoader(),
					userService.getClass().getInterfaces(),
					new InvocationHandler() {

					/**
					 *参数1 代理对象
					 *参数2 代理对象当前执行的方法描述(反射)
					 *参数3 方法参数
					 **/
					@Override
					public Object invoke(Object proxy, Method method, Object[] args) throws Throwable {
						System.out.println("proxy service before ........");
						Object obj = method.invoke(userService, args);
						System.out.println("proxy service after ........");
						return obj;
					}

				});
		return proxyService;
	}
}
测试类
public static void main(String[] args){
    UserService userService = new UserServiceImpl();
    ProxyService proxy = new ProxyService(userService);
    proxy.addUser();
}
从上面的代码可以看出动态代理创建在运行期,牺牲了运行效率,但不用创建大量的代理类,使用相对的更加灵活
Spring中的Aop
AOP的相关概念
| AOP术语 | 释义 |
|---|---|
| target | 目标类,即被代理对象 |
| joinpoint | 连接点,即目标类可能被拦截的方法 |
| pointcut | 切入点,即目标类被拦截的方法 |
| advice | 通知/增强,增强代码 |
| proxy | 代理类 |
| weaving | 织入,把advice和target结合生成proxy代理类的过程 |
| aspect | 切面,pointcut和advice形成的抽象切面 |

Spring AOP的原理
Aop底层使用代理模式实现
若目标类实现了相关接口,则使用JDK的动态代理实现
若目标类未实现相关接口,则使用CGLIB字节码增强实现代理
CGLIB JDK两种实现方式
CGLIB不要求目标类实现相关接口,但要求目标类必须可继承且被代理的方法必须可以重写。
这主要因为CGLIB是通过反射实现的动态代理,同时代理对象继承了目标类并添加了拦截器相关方法。
当用户调用代理类的方法时会先经过拦截器然后再去调用目标类的方法
介绍对应代码之前需要准备一个Advice通知类
public class MyAdvice {

	public void before() {
		System.out.println("before.........");
	}

	public void after() {
		System.out.println("after.........");
	}
}
内部类实现
CGLIB代理类
public class MyAspectCGLib {

	public static UserServiceImpl createService() {
		final UserServiceImpl userService = new UserServiceImpl();
		final MyAdvice myAdvice = new MyAdvice();

		Enhancer enhancer = new Enhancer();

		enhancer.setSuperclass(userService.getClass());

		enhancer.setCallback(new MethodInterceptor() {

			/**
			 *参数1 代理对象
			 *参数2 代理对象当前执行的方法描述(反射)
			 *参数3 方法参数
			 *参数4 方法代理对象
			 **/
			@Override
			public Object intercept(Object proxy, Method method, Object[] args, MethodProxy methodProxy) throws Throwable {

					myAdvice.before();

					Object obj = methodProxy.invoke(userService, args);
					myAdvice.after();

					return obj;
			}
		});

		UserServiceImpl proxyService = (UserServiceImpl) enhancer.create();
		return proxyService;
	}

}
测试类
public static void main(String[] args){
    userService = MyAspectCGLib.createService();
    userService.addUser();
    userService.deleteUser();
}
拦截器实现
CGLIB代理类
public class CGLibInterceptor implements MethodInterceptor{

	private  Enhancer enhancer = new Enhancer();
	private  MyAdvice myAdvice = new MyAdvice();

	public  Object setProxy(Class clazz) {
		enhancer.setSuperclass(clazz);
		enhancer.setCallback(this);
		return enhancer.create();
	}


	@Override
	public Object intercept(Object proxy, Method method, Object[] args, MethodProxy methodProxy) throws Throwable {
		myAdvice.before();
		Object result = methodProxy.invokeSuper(proxy, args);
		myAdvice.after();
		return result;
	}

}
测试类
public static void main(String[] args){
	CGLibInterceptor cglibInterceptor = new CGLibInterceptor();
	userService = (UserService) cglibInterceptor.setProxy(UserServiceImpl.class);
	userService.addUser();
	userService.deleteUser();
}
小结
通过上面两个例子我们可以看出,代理类对目标类userService的addUser和deleteUser进行了代理增强,这两个方法就是AOP的切入点,而userService中全部方法为AOP的连接点。
在代理类中,CGLIB在拦截方法中将Advice的相关逻辑与目标类的具体方法进行了结合形成了一个抽象的面这就是AOP的切面,通过invoke的核心字眼也可以很快判断出使用了Java的反射机制,虽然牺牲了部分效率但是却不需要重复创建大量的代理类,使用起来更加的灵活。
Spring AOP具体实现
执行具体代码之前需要对环境进行准备
- jar包:spring-beans 、spring-core、spring-context、spring-expression、spring-aop、spring-aspects、aspectjweaver
- 配置文件classpath下的applicationContext.xml
- 相关类
目标类接口
public interface UserService {
	public void addUser();
}
目标类
public class UserServiceImpl implements UserService{
	@Override
	public void addUser() {
		System.out.println("ioc add user");
	}
}
通知类
/**
 * 切面类要实现对应的接口,并实现对应抽象方法
 * MethodBeforeAdvice 前置通知 运行在执行目标类方法之前 可获得方法参数
 * afterReturning	后置通知 运行在执行目标类方法之后 可获得返回值
 * MethodInterceptor 运行在执行目标方法前后
 **/
public class MyAspectInterceptor implements MethodInterceptor{
	@Override
	public Object invoke(MethodInvocation mi) throws Throwable {
		System.out.println("proxy auto  before........");

		Object obj = mi.proceed();

		System.out.println("proxy auto  after........");

		return obj;
	}
}
半自动
applicationContext.xml
<bean id="userService" class="com.jun.service.impl.UserServiceImpl"></bean>
<bean id="myAdvice" class="com.jun.interceptor.MyAspectInterceptor"></bean>

<bean id="proxyService" class="org.springframework.aop.framework.ProxyFactoryBean">
	<property name="interfaces" value="com.jun.service.UserService"></property>
	<property name="target" ref="userService"></property>
	<property name="interceptorNames" value="myAdvice"></property>
</bean>
测试类
final static String PATH ="applicationContext.xml";

public static void main(String[] args) {
	ApplicationContext applicationContext = new ClassPathXmlApplicationContext(PATH);
	UserService userService = (UserService) applicationContext.getBean("proxyService");
	userService.deleteUser();
}
全自动
applicationContext.xml
<bean id="userService" class="com.jun.service.impl.UserServiceImpl"></bean>
<bean id="myAdvice" class="com.jun.interceptor.MyAspectInterceptor"></bean>

<aop:config proxy-target-class="true">
	<!--  * com.jun.service.impl.*.*(..)  -->
	<!-- 任意返回值 包.任意类.任意方法(任意参数)-->
	<aop:pointcut expression="execution(* com.jun.service.impl.*.*(..))" id="myPointCut"/>
	<aop:advisor advice-ref="myAdvice" pointcut-ref="myPointCut"/>
</aop:config>
测试类
private final static String PATH = "applicationContext.xml";

public static void main(String[] args) {
	ApplicationContext applicationContext = new ClassPathXmlApplicationContext(PATH);
	UserService userService = (UserService) applicationContext.getBean("userService");
	userService.deleteUser();
}
注解
applicationContext.xml
<!-- 开启注解扫描 -->
<context:component-scan base-package="com.jun"/>
<!-- 开启AOP注解 -->
<aop:aspectj-autoproxy/>
目标类
//将目标类加入到ioc容器中
@Component("annoService")
public class UserServiceImpl implements UserService{
	@Override
	public void addUser() {
		System.out.println("ioc add user");
	}
}
通知类
//标明这是一个切面类
//将目标类加入到ioc容器中
@Aspect
@Component("annotationTest")
public class AnnotationInterceptor {

	//方法名随意 此方法作为一个切入点的方法
	@Pointcut("execution(* com.jun.service.impl.UserServiceImpl.*(..))")
	public void pointCutMethod() {}

	//注解里面的pointCutMethod()即为上面定义的切入点方法
	@Before("pointCutMethod()")
	public void before() {
		System.out.println("annotation before.........");
	}

	@After("pointCutMethod()")
	public void after() {
		System.out.println("annotation after...........");
	}

	@Around("pointCutMethod()")
	public void around(ProceedingJoinPoint pjp) throws Throwable {
		System.out.println("around before..........");
		pjp.proceed();
		System.out.println("around after.........");
	}
}
测试类
private static final String PATH = "applicationContext.xml";

public static void main(String[] args) {
	ApplicationContext applicationContext = new ClassPathXmlApplicationContext(PATH);
	UserService userService = (UserService) applicationContext.getBean("annoService");
	userService.deleteUser();
	userService.addUser();
}
