FDS服务器搭建
架构介绍
FastDFS是使用c语言编写的一款分布式文件系统。专门为互联网量身定制,充分考虑了冗余备份、负载均衡、先行扩容等级制,并注重高可用、高性能等指标,使用FastDFS很容易搭建一套高性能的文件服务器集群并提供文件上传、下载服务。
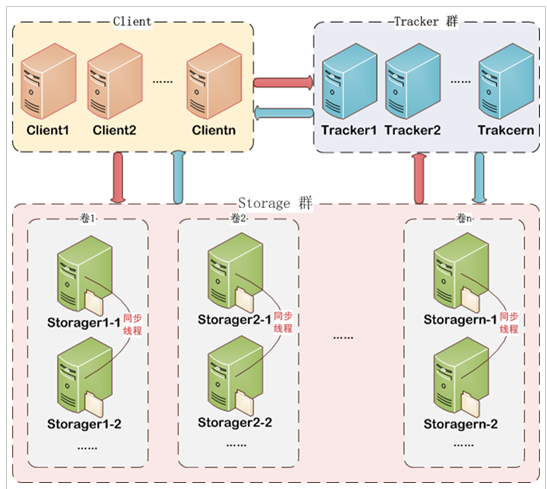
FastDFS架构包括 Tracker server 和 Storage server。客户端请求Tracker server进行文件的上传下载,通过Tracker server 调度最终由Storage server完成
Tracker server 的作用是负载均衡和调度,通过Tracker server可以根据一些策略找到Storage server提供下载或上传服务 可以理解为调度服务器或追踪服务器。
Storage server作用是作为文件存储,客户上传的文件最终存储到Storage服务器上,Storage server没有独立的文件系统,利用操作系统的文件系统来管理文件,可以理解为 存储服务器。
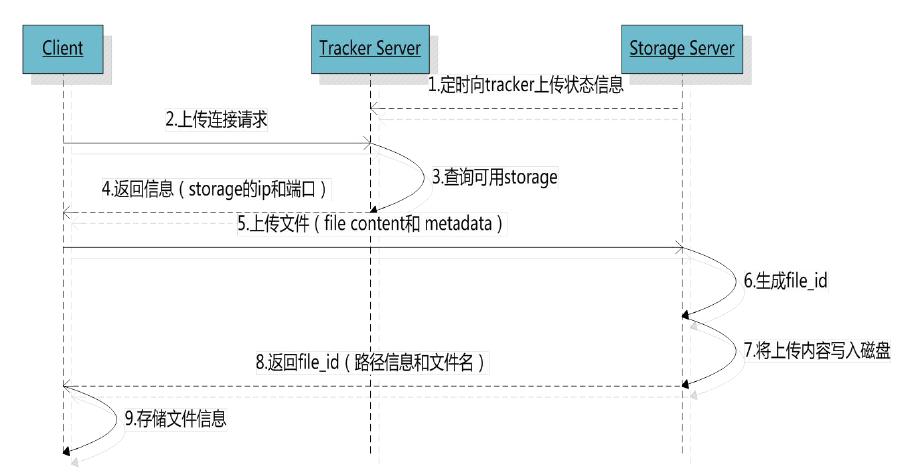
上传流程
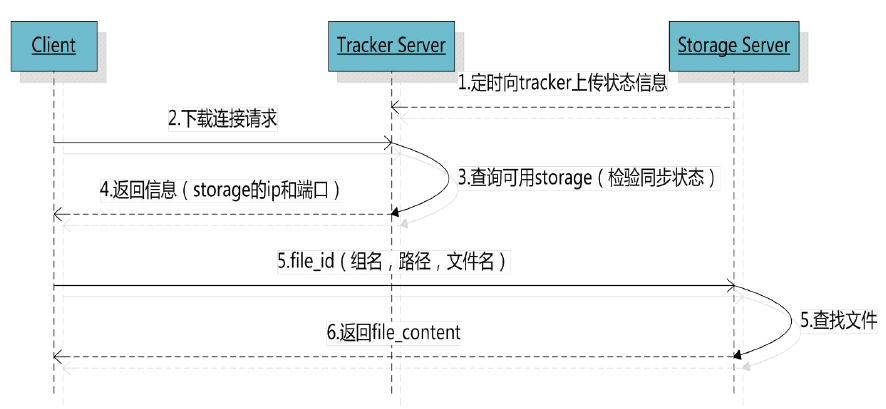
下载流程
安装环境
| 名称 | 说明 |
|---|---|
| centos | 7.x |
| libfastcommon | fdfs公用函数包 |
| fdfs | fdfs本体 |
| fastdfs-nginx-module | fdfs nginx扩展模块 |
| nginx | 1.61.1 |
编译环境
yum install git gcc gcc-c++ make automake autoconf libtool pcre pcre-devel zlib zlib-devel openssl-devel wget vim -y
安装流程
libfastcommon
#libfastcommon
git clone https://github.com/happyfish100/libfastcommon.git --depth 1
cd libfastcommon
./make.sh && ./make.sh install
fdfs
# 安装
git clone https://github.com/happyfish100/fastdfs.git --depth 1

cd fastdfs

./make.sh && ./make.sh install

#复制配置文件到指定目录
cd conf

cp * /etc/fdfs

#fdfs命令存放位置
/usr/bin/fdfs_*
#fdfs配置文件存放位置
/etc/fdfs/*.conf
```配置tracker

```shell
#配置Tracker
vim /etc/fdfs/tracker.conf

#修改配置文件
#根据配置文件 去开放对应的端口[22122]
#修改日志文件的存放目录
base_path = /home/fastdfs/tracker

#启动服务
/usr/bin/fdfs_trackerd /ect/fdfs/tracker.conf
#自启服务
chkconfig fdfs_trackerd on
```配置storage

   ```shell
   vim /etc/fdfs/storage.conf

   #修改配置文件
   #根据配置文件 去开放对应的端口[23000]
   #修改日志文件的存放目录
   base_path = /home/fastdfs/storage
   store_path0 = /home/fastdfs/storage
   tracker_server = 127.0.0.1:22122

   #启动服务
   /usr/bin/fdfs_storage /etc/fdfs/storage.conf
   #自启服务
   chkconfig fdfs_storaged on
   ```测试

   ```shell
   vim /etc/client.conf

   #修改配置文件
   #根据配置文件 去开放对应的端口[23000]
   #修改日志文件的存放目录
   base_path = /home/fastdfs/client
   tracker_server = 192.168.5.130:22122

   /usr/bin/fdfs_test /etc/fdfs/client.conf upload test.jsp


   #根据上传得到的url 查看是否存在图片比如
   url: http://192.168.5.130/group1/M00/00/00/wKgFgl3twV-AZokSAABdreSfEnY807_big.jpg
   文件位置: /home/storage/data/00/00/
安装nginx fdfs的扩展模块
git clone https://github.com/happyfish100/fastdfs-nginx-module.git --depth 1

cd fastdfs-nginx-module/src

vim config
#去掉文件中所有的local

wget http://nginx.org/download/nginx-1.15.4.tar.gz
tar -zxvf nginx-1.15.4.tar.gz
#nginx编辑安装参数 安装之前保证对应的文件夹存在
./configure
–prefix=/usr/local/nginx
–pid-path=/var/run/nginx/nginx.pid
–lock-path=/var/lock/nginx.lock
–error-log-path=/var/log/nginx/error.log
–http-log-path=/var/log/nginx/access.log
–with-http_gzip_static_module
–http-client-body-temp-path=/var/temp/nginx/client
–http-proxy-temp-path=/var/temp/nginx/proxy
–http-fastcgi-temp-path=/var/temp/nginx/fastcgi
–http-uwsgi-temp-path=/var/temp/nginx/uwsgi
–http-scgi-temp-path=/var/temp/nginx/scgi
–add-module=/root/fastdfs-nginx-module/src
```shell
make && make install

cp fastdfs-nginx-module/src/mod_fastdfs.conf /etc/fdfs

vim /etc/fdfs/mod_fastdfs.conf

#修改配置文件
#根据配置文件 去开放对应的端口[23000]
#配置tracker服务器地址
tracker_server=127.0.0.1:22122
#配置url中是否包含group
url_have_group_name = true
#配置fdfs的图片存储位置
store_path0 = /home/fastdfs/storage
```配置nginx

```shell
#配置对应的server 开放80端口
server {
        listen       80;
        server_name  localhost;

        location /group1/M00/{
                #root /home/FastDFS/fdfs_storage/data;
                ngx_fastdfs_module;
        }
}

sbin/nginx
sbin/nginx -s stop
在java中调用fdfs
安装fdfs jar
git clone https://github.com/happyfish100/fastdfs-client-java.git
cd fastdfs-client-java
mvn clean install
创建maven项目 导入fdfs jar
<dependency>
    <groupId>org.csource</groupId>
    <artifactId>fastdfs-client-java</artifactId>
    <version>1.27-SNAPSHOT</version>
</dependency>
创建配置文件 fdfs_client.conf
#配置tracker服务器地址
tracker_server = 127.0.0.1:22122
编写测试类
@Test
public void fdfsUpload(){
    try {
        ClientGlobal.init("fdfs_client.conf");

        TrackerClient trackerClient = new TrackerClient();

        TrackerServer trackerServer = trackerClient.getConnection();

        StorageServer storageServer = null;

        StorageClient storageClient = new StorageClient(trackerServer,storageServer);

        String[] strings = storageClient.upload_file("F:\\test.jpg", "jpg", null);

        for (String temp: strings) {
            System.out.println("---------->"+temp);
        }
    } catch (IOException e) {
        e.printStackTrace();
    } catch (MyException e) {
        e.printStackTrace();
    }
}
测试结果